Wednesday 31 March 2021

Contact Printing

 A couple of weeks ago I was excited to take part in a Zoom workshop on contact printing, a simple and straightforward technique of making monoprints that has somehow managed to elude me. The workshop was put on by Graphic Studio Dublin (which has also been hosting fabulous artist talks every Friday morning) and facilitated by artist Clare Henderson who had sent out materials packs in advance of the workshop. Although I had tried this technique before, I was never able to get good results so was really looking forward to actual instruction to help me come to grips with it. As with other remote workshops that I have taken over lockdown, I commandeered the kitchen for a workspace. 


The materials pack included a new roller, azua ink, magneisum powder, spreaders, an acetate plate and sheets of newsprint as well as various sheets of fine Japanese printing paper. Participants were asked to bring rags, bowl of water, a variety of mark-making tools and masking tape.
 

The instructions were clear and straightforward: attach the fine paper to the acetate, cover with the newsprint, roll out azua ink on the acetate plate, fold the paper over the ink, cover with the newsprint and make marks on the newsprint. The pressure marks made on the newsprint would lift the ink from the acetate plate to create the monoprint. There was a beautiful additional light background texture that the paper would pick up from the rolled ink where pressure hadn't been applied. This is my first test print.


For my second test print I worked larger and only used a few mark-making tools (pencil and some stamps)/


I couldn't believe how quickly the time went by, but I definitely got an understanding of the process. Here is my workspace towards the end of the workshop. I didn't need to use the magnesium powder but Clare Henderson went over its use and demonstrated how to mix it with the azua if the ink was not viscous enough.


Clare Henderson specifically recommended azua inks when I asked about using other water-based inks. However, I did not want to go out and buy a new set of inks when I already have large tubs of Speedball ink, which I use for lino and wood block prints. I have found Speedball inks infinitely superior to other lino inks that I have attempted to use so I wanted to try them out on contact prints. Here is the contact print I made using Speedball ink and I am very happy with the results! I used a pencil and a hard eraser to make the marks.


Wednesday 24 March 2021

painting

I am working slowly but steadily on the large painting, Knockeen, which is based on my memories of the place and events of my time at the second house I lived in, in Kerry, from the spring of 1995 to the fall of '96 (when I returned to Bray). To bring you up to speed, I previously blogged about starting this painting here and its very early stages here. In the last week of February it looked like this.


I started adding some darker blue into the night section of the sky, several of the calla lilies (from a dream), the blue glass ball on the gate, and I used blue to start the delineation of the animals (cows and people). Several years ago, I posted pictures of a couple of works on paper that are relevant to this painting, their subject matters being the Kerry night sky and Comet Hyakutake in one, and the field gate and ruin in the other. You can check out those images and that post here.


Here is a close-up of the blocked-in callalilies. I had never seen so many callalilies till I moved to Kerry. Huge bunches of the white flowers graced country lawns, but when I dreamt of them they were pink and blue.


I knew I wanted a deeper green around the flowers than I had first blocked in, so I mixed a different colour. This also added a more definite shape to the flowers.


Here is a more detailed picture of the figures and cows being delineated by blue.


I added in some more purple (dioxazine violet) as my preferred stand-in for black, delineating the ruins, the two outbuildings, and some of the clothing on the figures.


No, I did not use brown for hair or an outbuilding - this is a mix of dioxazine violet, cadmium red medium and a smidgen of cadmium yellow light! Another shade of green can be seen in the bush here too. I also used some titanium white on the cows and t-shirt of the woman, plus some pale pink for the snouts of the beasts. Coming along nicely!


Wednesday 17 March 2021

Lá Fhéile Padraig!

Since my child was very little, we marked each month with seasonal decorations, so there was always something to look forward to. Many of the decorations are homemade and used every year, stored for annual use. I made paper shamrocks of varying sizes which could be blue-tacked up in any number of configurations. Here are some shamrocks with the LED lights on the glass bricks in the kitchen.


Decorations made in school have also been kept. This little decoration always hangs on the kitchen door at this time of year. Judging by the scribbles of colour and the pre-made regularity of the shapes, I think this decoration is very early in the primary years!


More shamrocks take up space on the other side of the glass bricks, in the entrance hallway opposite the coat rack.


The hallway is also the home to bunting, flags, more shamrocks, and a pendant on the door leading to the living room.


St Patrick's Day is Ireland's national holiday and this is the second year that live national festivities have been cancelled due to covid. It will still be celebrated in my house, however, with a festive meal and some Irish coffee. Abarta Heritage did a very interesting podcast, in their Amplify Archaeology series, that gives further information on the historical figure who was St Patrick; have a listen to it here

Lá Fhéile Padraig! 

Wednesday 10 March 2021

portrait drawing workshop

 A couple of weeks ago, my husband became aware (via his facebook news feed) of a free portrait drawing workshop to be held online, by Raw Umber Studios. Neither of us had done this kind of drawing in a long time, so we both signed up for the one hour workshop, just as something to do on a Sunday afternoon. Charcoal was the suggested medium and the first "pose" was ten minutes long.


The tutor, Lizet Dingemans, worked alongside the livestream platform, talking through the various steps, such as marking measuring off points quickly, blocking in areas of light and shade, etc. The "model" was a group of well-lit photographs (of the same person), which changed with each pose. The second pose allowed 20 minutes for a drawing, and again I used charcoal on white paper.


I found that I was watching the alongside drawing of the tutor too much, so I decided with the third drawing, a half hour pose,  I would use black and white conté on grey paper. It was delightful that the studio was offering this introductory workshop for free, which I imagine is a way to get more people to pay for additional courses. It's been a few decades since I've attended any formal classes, but as a working artist this workshop provided a good excuse to simply do some drawing that has nothing to do with my current work. 


Wednesday 3 March 2021

pizza dough

Well we are coming up to the year mark now, since coronavirus has become part of our lives! As usual, it seems, we are in the middle of a lockdown, yet there is at least not the panic at the grocery store that there was in the beginning. A year ago we just barely managed to get flour and yeast when we decided that we would make pizzas on Saturdays to cheer ourselves up. Nearly a year later there doesn't seem to be any problem with food supplies and the Saturday pizza tradition is firmly ensconced - we only gave it a short hiatus when we were busy with other foodie traditions (like at xmas and Chinese New Year). Happily, we have a brilliant child's cookbook with an easy, fool-proof and perfect bread dough recipe that I have made slight modifications to and use weekly for our base. I make my pizza dough on Fridays so it has plenty of time to rise and I have plenty of time to do other things on Saturday. Here are the ingredients: 4 oz coarse, brown or wholemeal flour; 12 oz flour (plain or self-raising); 1 tsp salt; 1 tsp brown sugar; 1 sachet yeast (2 tsp), 10 fl oz warm water (not too hot, not too cold), 1 oz butter. Mix all dry ingredients together in a large bowl. Rub in the butter.


Then add the water. It is very important that the temperature is not too hot or cold. I usually boil a kettle first and put some boiled water in my measuring cup which is already partly filled with cold water. I just dip in a finger to test the heat (so you never say "ow" but sometimes it's too cool - a bit like testing a bath).


Mix around with a wooden spoon at first, then use your hand.


Knead the dough. I do it directly in the bowl, sometimes adding a bit more flour if it seems too moist.


Knead for about 5 minutes until it looks happy!


I just pick up the ball of dough, add a bit of sunflower oil to the bottom of the bowl and use the dough ball to move it around so that there's some oil covering all the dough. I cover the bowl with a dish towel and don't go near it again till the next morning.


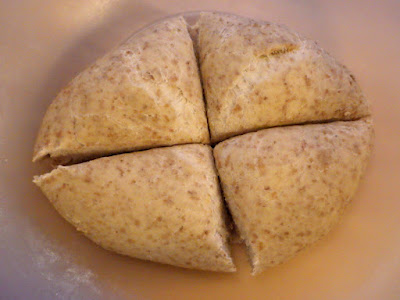
The dough has risen quite nicely overnight, and in the morning I reknead it. Usually it has gotten a bit dry or crusty on top, but with some kneading it will be back to a nice dough ball again. Then I leave it for the rest of the day, so it rises again. In preparing for dinner, the dough is divided into 4 


and each section rolled out separately. 


I prefer thin-crust pizza, so this recipe fits perfectly on 4 oiled, standard cookie trays. If a thicker pizza crust is preferred, obviously divide the dough only in 2 or 3 and don't roll out as much. In my house we like a tomato sauce base, and I have previously given that simple recipe here.