Wednesday, 27 May 2020

preparing aubergine deliciously!

I seem to know a lot of people who don't like eggplant/aubergine/melanzane (your choice of word!) but I have always enjoyed this vegetable as a real treat. I have several specific recipes where it is the key ingredient - my recipe for Imam Bayildi is here - and I always try Melanzane alla Parmigiana when given the opportunity in a restaurant (like in Rome or an Italian restaurant in Barelona...) to see if my version is authentic (it is). But aubergines are fabulous also when they are simply prepared and fried or grilled and eaten with some crusty bread, olive oil, and some cheese. The first time I went to Rome, every morning for breakfast I enjoyed an omelette, sundried tomatoes, mozzarella cheese & a slice of melanzane all jammed and heated deliciously in a panini. As you might expect, this kept me fortified for intensive site-seeing for 5 days in this magnificent city!

To prepare the aubergines, top and tail, and then slice lenthways as if slicing a loaf of bread (I always prepare 2 at the same time). Place in layers in a collander, salting each layer before adding another layer. Leave to drain for at least 5 minutes.


Rinse well, and then pat dry, gently on a clean dish towel.


Put some flower on a plate and coat the aubergine on both sides.


Add coated aubergines to a hot, oiled pan. They will cook fairly quickly, which is obvious as they start to brown. They can be eaten hot or cold, or used as the basis for Melanzane alla Parmigiana (put in layers with a simple tomato sauce and cheeses - a method similar to a lasagne but there is no pasta in the dish). I think these would be lovely grilled on the bbq too, and must try this over the al fresco season!


Wednesday, 20 May 2020

Knockeen - preparations for new large painting

I am getting ready to embark on another large painting for the Memory Is My Homeland series. After moving to Ireland in the winter of 1993, we moved to Kerry early in the new year of 1994. We rented a house at Darby's Bridge and got married the following year. I think our landlord was very worried that we were getting too ensconced in our little village (the whole village celebrated our wedding, both before and on the day!) and pulled the rug out from under our rental. As we were not ready to leave Kerry just yet, we had a fair bit of help (both human and supernatural!) in finding another place to live. Knockeen, just outside Portmagee, was our rural home for the next year and a half. It is representative of the huge part of my life as an emigrant, getting settled, living rurally, being married, and continuing with my creative life. My Dad also died in 1995, which precipitated my return to civilisation the following year. But in the meantime, there was so much that I remember about this place: the brisk swims in Portmagee Channel (behind our house), the most amazing blackberries from our own boreen, the fuchsia hedges on the roadside, the brilliant red-orange montbretia and wild roses winding and beneath those hedges, the ubiquitous and mischievious cows, the smell and look of grassy wedges of unprocessed turf, the phenomenal night sky with no light pollution - perfect views of the river of the Milky Way and Comet Hyakutake, and so much more. Of course, even for a large painting I have to pick and choose what concepts will be represented.  I sketched the composition I had in my head. I inluded blackberries, calla lillies (I saw these for the first time in rural Kerry gardens and used them in an installation tribute to my Dad; I blog about that here), fuschia, wild roses, the buildings of the house, sheds, and ruins, the gate that led to the field at the front of the house, the night sky, and of course several cows.


I envisage this as mostly a daylight painting, but insist that Comet Hyakutake and the night sky must make an appearance. When I was in Venice last October, I visited the Peggy Guggenheim collection and this Magritte painting, Empire of Light, has night and day together, so my painting won't be the first to introduce such an anomaly. Whereas Magritte's painting is disturbing and somewhat menacing, I am adding the night sky in recognition of it's magnificence - the feeling of natural awe.


As everything is blooming at the moment, it was easy enough for me to simply go outside and sketch some of the foliage from the wild rose in the front yard. It is the same plant that was across the road from our house in Darby's Bridge, which we brought with us when we moved to Knockeen and planted beside the gate, then uprooted it again to bring with us when we moved back to Bray in 1996.


There is a wild fuschia hedge in the front yard too. The wild cuttings overtook the garden varieties when we planted them outside the current house when we moved here nearly 18 years ago. Each year the hedge grows to a massive size, which the bees love, and gets cut back in the winter.


I did a colour composition sketch that has all the elements and general placements that will appear in the final painting. I was looking at some previous work I have done related to Knockeen here and here. In the earlier image of the comet, it appeared in the sky at a different angle so I will probably be changing that in the final painting. A few more research drawings and I'll be ready to start!

Wednesday, 13 May 2020

Home Sweet Home Goodbye - chapbook

In a previous post I spoke about founding a press to produce my first chapbook (info here) and in another post I spoke about the card I made my Grandmother in 1969 (info here), which has inspired the title and cover design for this first chapbook of poems. To get a better idea of lino design, I used a black marker to create sketches for the cover design sketches. This allowed me to immediately see what changes I needed to make before proceeding.


In a later sketch I also used a white pen to make contrast more apparent.


To transfer the design onto the lino block, I used the simple, old-fashioned technique involving tracing paper


and graphite.


Once the tracing paper was ready, it was affixed to the lino block using masking tape (ie, the tracing paper was taped down on the other side of the lino block).


This picture shows the ready-for-cutting lino block beside the template sketch.


This picture shows that I have started cutting into the lino! NB the picture was taken at an angle in order to see the groove marks that cutting makes.


Wednesday, 6 May 2020

Room-Mate

Last year, shortly after I started the Home Project, the beginnings of which you can see here and here, I stretched several small pieces of canvas on wood with the intention of doing more oilstick drawings. I got sidetracked by deciding to work on a large painting, rather than work small again, which resulted in the large painting of the main house of my formative years, Kingswood. I have since entitled this body of work Memory is My Homeland. 


After stretching the canvas on the wood, I gave it several coats of gesso. This is especially important as the media I was planning to use was oilstick.


For many years now I have painted a ground coat on a gessoed canvas in quinacridone violet. I think there is a luminescence to this colour and I don't mind if it shows through in a finished work, so I can leave edges rough if needs be.


In my current series my desire is to show more than simply the architecture of a place where I lived, but things associated with those places. Over the year that I haven't worked on the small canvases, I have kept them in mind. When I came across a Polaroid of an oil portrait I had painted of a woman who was briefly my room-mate in a shared flat in 1981, I thought to take that memory and do something with it. I have previously spoken of this place and its relation to the series here.  The Polaroid of the painting is all that exists of the portrait of a room-mate whose name eludes me, though I remember quite a few things about her with fondness.


Room-Mate, oilstick on unstretched canvas, 41 cm x 34.5 cm, 2020


Wednesday, 29 April 2020

making zines!

I follow Austin Kleon on Instagram and he has been posting loads of little zines during the lockdown. He normally makes these as loving notes to include in his young son's lunchbox. Recently he has included little videos showing how he makes the zines. You can see his instructions here. Easy enough, with no glue and not even a scissors to cut the part that needs to be cut (just carefully tear along a crease) though a bone folder is an invaluable tool. I tried some zines myself, using images of maps from an Aramco World calendar that I didn't just want to bin - the maps are too interesting!


Although using a standard size (letter or A3 page) allows for easy reproduction of a zine, I wondered how the method would translate to larger and heavier pieces of paper. I decided to find out and pulled out some paper samples to turn into large zines.


The heavy pages are definitely harder to fold than the photocopy or typing paper... First fold in half.


Then fold in half again.


The third folding in half is even a challenge for the bone folder and the edges do not stay uniform.


Unfold back to the first folding so that centre creases are visible. The crease on the lower fold (if you consider that the upper part is open, as is obvious here with one of the calendar page zines).


With the heavier papers I took out my matte knife as I knew some cutting would be necessary, rather than simple tearing.


Unfold the whole page and the cuts are in the centre. It is easy to unfold and this is very useful if you are going to photocopy your finished zine. I was also curious about more formats for zines, again made from 1 initial standard sheet of paper that is easily reproducable, and found several youtube videos for making an 8 page and a 14 page zine, courtesy of autumnthing.


Pick the page up and push the ends together so that a central square is automatically formed.


Continued pushing will bring the "squared" pages together and voilà, your zine is ready to become whatever you want! With heavy paper you may need to crease the folds again with the bone folder.


Wednesday, 22 April 2020

wild garlic chutney

Normally at this time of year I am doing lots of shinrinyoku in Knocksink Woods, near Enniskerry, having a heyday picking wild garlic which grows in abundance as floorcover in the woods. However, this year, the woods are beyond the 2 km limit. Luckily we have been "cultivating" wild garlic below our fuschia hedge, and so there is a small amount to make things with.


This year, one of my nieces sent me a recipe for wild garlic chutney, so I thought I would try it. I did make a few changes to the recipe and it was delicious, so that is the recipe I'll share. First things first, the recipe called for 100g wild garlic leaves. I was surprised at how much this was - about 40-50 leaves. But the recipe asks for you to wilt the leaves (pour some boiling water over them for a couple of seconds) and then refresh in cold water, so this definitely shrinks the volume down. I am not sure what the point of this is, because I don't do it when making pesto and I don't have any problem with leaves being too fibrous to digest (this was the only reason I could imagine...).


Other ingredients: coriander 25g, juice of 2 limes, 3 green apples (peeled & cored), 1 tsp brown sugar, 2 dried hot peppers (use scissors to cut), and fresh ginger (as if making tea for 2).


Whizz all the ingredients together in a food processor. It is delicious eaten with crackers and cheese, or with anything else that you would eat a chutney with -- halloumi, potatoes, naan bread... I think next time I make it I would only use juice of 1 lime and perhaps only one hot pepper. I have not tried freezing it as the batch wasn't that big (and I gifted some away), but I can imagine that it could be frozen for future use.


Wednesday, 15 April 2020

collage cards

Before nearly every special occasion (holiday, birthday, anniversary) I get out my materials for making cards and work away. I have previously blogged about collage cards here and here.While I use print and drawing media in cardmaking, I tend to make collages most frequently. I do not cut paper, I carefull rip shapes from it and only use a steel edge ruler for helping to tear straignt edges, such as when I want a coloured background or in landscape images. While liquid glue and an old credit card are good for spreading, a glue stick is the most convenient.


The detritus in the picture above was caused from tearing egg shapes from patterned wrapping paper. I always save scraps of different papers if I can imagine them being repurposed at a later date, and this is a good example of that.


Often cards are related to artwork I am going to make or have already made. This 1988 St Patrick's Day card (made for my "new" boyfriend - now my husband!) refers to a dream I had in the early '80s and subsequent artwork, Ocean of Life. I had also studied the poetry of Wallace Stevens in 1986 and adored the poem Our Stars Come from Ireland, inspiring the imagery of the green stars in churning water.


This postcard from 1988 was also based on a dream: on my first visit to British Columbia; although I didn't see any whales on my ferry trip from Vancouver to Victoria, my mind really wanted to! I remember wanting a durable backing for the card to make it from BC to Toronto, so I made do with a piece of cardboard from a cereal box.


Other cards have also been inspired by travel. This card was inspired by my visit to Sicily in 1997 where I saw some Greek ruins at Segesta.


Quite often I simply make cards from what is in front of me. In this case I simply reproduced the image of my avocado houseplant. I used some patterned green wrapping paper that I had saved in my re-use paper file.


Likewise, this get well card, made for my daughter in 2008. simplified the fish tank in her bedroom.


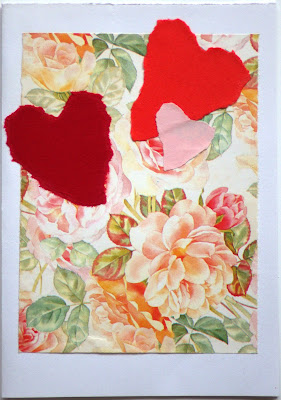
I am often lazy with images too, simply using egg shapes for Easter (as above), shamrock shapes for St Patrick's Day, and hearts for Valentine's Day...


Often I reuse images in the same year, if I am obsessively working on a project. In 2015-2016 I was hard at work on The Skipping Project (I refer to it here, here, here, and here), a multi-media project that was to be my MA thesis project (for personal reasons the project was never finished). I used the child's feet skipping rope in a number of cards. The rope in this card was made from a collage tape I made (using double-sided tape) from chocolate wrapper foil.


I used the skipping image again for Paddy's Day, though I replaced the shoes with traditional dancing hornpipes and drew the rope in as shamrocks.