Wednesday, 27 September 2017

Encaustic


 In the early 1980s, I was doing some experiments with wax in both painting and drawing. I was not doing anything methodical, so I can't exactly say I was working with encaustic painting, but my own experiments led me to some knowledge of the technique and curiosity about it that has stayed with me over the years. This piece from 1983 is paint, collage and paraffin on paper.


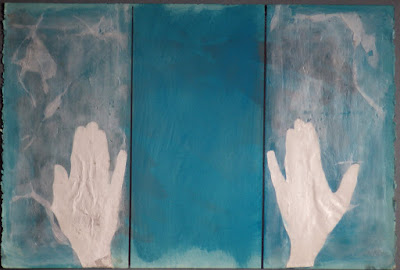
This piece, also from 1983 I think, is collage and wax paper on board. The image of the hand, as a metonym for a person, is relevant to the embossed prints I am doing now for my book "Ghost".


So when I read about an introduction to encaustic painting workshop being facilitated by Joanna Kidney at Outpost Studios here in Bray I jumped at the chance to attend. Lucky for me I secured the last place on the intimate workshop, and had a nice stroll across the park last Sunday morning to Outpost Studios. After an introduction to the technique, Joanna offered the participants a choice of wooden blocks to use as mounts for our workpieces that would allow us to learn a variety of techniques. 

As a starter, I chose a fairly small piece of wood and thinking of The Skipping Project, used the form of two jumping feet with which to experiment. After a quick sanding of the sides, we applied a clear layer of beeswax mix, and then two layers of whitened beeswax mix. After any layer of beeswax (coloured or clear), the block must be heated to fuse the wax to the layer below. For the first block we used a variety of tools to scrape, incise, carve, etc. the block in between applying colours (in heated wax). There was also a good supply of fat oilsticks, oil pastels, and a hot wax drawing tool to use in conjunction with the pre-mixed paints (with various sizes of brushes) warming on the hot surface of a flat type of "griddle". Joanna pointed out that an important tool to have is a specialty flat thermometer on the griddle to ensure that the wax paint does not overheat and fume, as this can be quite toxic.


In the afternoon, with another block, we learned about collage techniques for embedding objects and images (in my piece below there is a pictue of two rocks, wool, thread, and cous cous). We also learned how to transfer an image from a photocopy or print out directly onto the wax; in my case below I transferred the image of some pebbles from a colour photocopy of a photograph I took, as reference for the Stones book of prints that I am making.


In the afternoon of the workshop, Joanna also gave a demonstration of monoprinting in encaustic. A space was cleared on the griddle and one could brush on paint or draw with oil pastels or oil sticks (the drawing/painting melting on the warm griddle) and there were a variety of papers to choose from to experiment with how the different grounds interacted with the wax, also depending on which wax medium was used!

This is Fabriano paper as a ground for a mix of brush work and oil pastel drawing.


Again, a mix of brushwork and oil pastel for my "Dreamboat" image, but pulling the card away from the griddle leaves a pattern.


I only added a bit more wax colour to this rice paper Dreamboat.


I was thinking of Fort Carré when I brushed out this simple image of light and dark on Fabriano paper. The turquoise was drawn with oil pastel.


What a fabulous day for creative play with an interesting medium and a wonderful facilitator!

Wednesday, 20 September 2017

Pasta Machine Press - flatbed printer!

I had been using my pasta machine press successfully with monoprints in 2016, but after taking a print workshop in the spring of this year at the National Print Museum Dublin, my husband suggested it might be easier if I did some further adjustments on the pasta machine to turn it into a flatbed printer. This is the happy result, and below I will give some steps to converting a pasta machine into a small press!


My pasta machine had a base that was just screwed on, so it was easily removed.


 I planned to do some long prints, with the pasta machine on the kitchen table, so this was taken into account when creating a box structure that the machine could sit in. A box structure is required also to facilitate additional clamping to the table the press will rest on. This is a view of the finished flatbed printer including the 800 micron acetate which serves as a flatbed. Please note that the acetate is not affixed.


A bespoke groove is made into the top side of the box in order to facilitate the pasta machine.


This is the view from the right side of the machine, resting in the box structure. The hole on the side is where the crank fits in, so this side must be on the edge of the table.


This view primarily shows how the left side of the pasta machine is clamped to the wooden structure.


This is the press and structure turned on its side so that the under structure can be seen. The press is clamped to the structure.


This is a view from directly underneath the pasta machine.


A view from underneath; at either end there is a small plank of wood affixed to the structure to accommodate further clamps needed for affixing the structure to the table. At first I did not attach the structure to the table, but doing so saved me from having to press down on the machine while printing.


This picture is a side view that shows how the structure is attached to the table by a clamp.


This is a further detail view of the clamp attaching the slat on the structure to the table.


 This is a side view that shows how the 800 micron acetate serves as a flatbed.


I have found that oilcloth makes a good substitute for felt. It is cheap, has a heavier weight for its thin-ness than felt, and is more useful for me, in that I have been doing long prints and needed an unavailable size felt (two pieces of felt left a seam mark in my print!). Be sure to print smooth side up when using oilcloth to avoid any texture inadvertently appearing on your print.


I have tried to make these instructions as simple as possible, but please comment or message me if something is unclear. I have been doing intaglio prints and embossed prints using this machine, so it is working!

Wednesday, 13 September 2017

New notebooks - pouch binding - part 2

As I mentioned in last week's blog, I had decided to make some notebooks/sketchbooks from my Mum's handbags. I also mentioned that I had taken the Future Learn online course "Japanese Culture Through Rare Books" offered by Keio University and was inspired to make several pouch bound books, which utilised recycled paper. Last week's instructions were about preparing the pouches (i.e., creasing and folding paper such that the pre-used side was inside and the outer, clean layers would form the pages). This week is mostly about creating the covers, in this case a hard(ish) cover. The final binding is originally a Japanese technique - "stab binding" - which I have blogged about previously.

When I removed the lining from the purple handbag, I found that the underside of the vinyl had a fuzzy, kind of sticky, coating. My decision to use this for a hardcover was clear as I definitely didn't want this part of the handbag visible in my final book. I cut two pieces of vinyl to a size slightly larger than the cardboard base covers and clipped the corners. The pictures are mostly of the back cover, which does not have any bumpy surfaces.


I used an old plastic membership card to spread PVA glue over the entire surface of the vinyl underside.


The cardboard base was placed on the vinyl.


The vinyl was folded over the cardboard.


It was necessary to use lion clips to hold the folded vinyl down while the glue was drying.


A sheet of paper was cut to the size of the two covers plus the book spine (hold the pouches together tightly and measure the spine; in the case of pouch binding, it is the "open" side of the pouch, opposite the fold, which will be bound). Glue is first spread on the back cover. Again, an old plastic membership or bank card is ideal for spreading the glue.


The right side of the paper is gently pressed onto the cover.


The procedure is repeated for the front cover, making sure to let the far right side of the paper meet up with the far right side of the cover. The spine space between the two covers is apparent. Note that the front cover of my book is quite bumpy. I had to be careful not to rip the paper when adhering it because


 there were pleated and wired details on the original handbag that I wanted to keep on the bookcover.


I spread out the bookcover concoction and placed it between several clean pages, before weighing down with some heavy books until the glue dried completely (overnight at least).


Once the cover was dry I prepared everything for binding. I used some marbled origami paper for end papers. The lion clip is holding everything in place while I get ready.


Putting holes through the covers and folios is very important. I cannot stress this enough. For a book of this size (A5) five holes will do nicely. The lion clips are necessary to hold everything in place while the holes are being made and while the book is being sewn.


The sewing technique is Japanese stab binding. Make sure to make the holes large enough all the way through the layers (front cover, endpapers, folio-pouches, back cover) in order that you may sew through the same hole several times with your binding thread. Here I am using 3-strand cotton embroidery thread, folded so the first sew is 6 strands and the second sew is 12.


I cannot stress enough the importance of making the holes wide enough -- I ran into a problem with not being able to go beyond the initial 6 strands in the middle hole of my book. I didn't mind working with the idea of bypassing the hole since this is a personal book (not for a gift) and my first attempt at pouch binding as well as my first attempt at a hardcover book. However, for stability and security as well as for design, I think it is a better idea to ensure the hole is a good size to begin with!


The final book is sturdy and quirky. I like it!


Wednesday, 6 September 2017

New notebooks - pouch binding - Part 1

As soon as I received a bag of my Mum's old handbags, I had the idea that I would convert them into notebooks or sketchbooks. The handles on the bags are an interesting, decorative detail but I haven't decided yet whether they will be used in the final books.


 Earlier this year I took a free MOOC course offered by Keio University in Japan, through Future Learn. The course was called Japanese Culture Through Rare Books, and one of the styles of book-binding discussed was "pouch binding", which made great use of paper (rare in ancient Japan) that was already used on one side. Having a great supply of paper to recycle I decided that I would try pouch binding for my handbag books. On a historical note, pouch bound books give historians great insights into a period when a book is un-bound for conservation purposes: the original information on the paper is intact!


To reiterate: the used paper should be completely blank on one side. This is what will be visible in the final books.


 After cutting the A4 pages in half my trusty bone folder was used to fold the now A5 pages in half, the used side in, such that blank pages are what is visible.


I stacked my folios in piles of 10 for ease of keeping track of the count. In pouch binding it is the folded part of the book that is the turning part of the page, while the "open" long side of the pouch page is bound as the book spine.


Before continuing with the binding of pages, I had to cut up the bags. I want these to be hard cover books so I also cut some corrugated cardboard to a size slightly larger than the folios.